Da Red Gobbo and Bounca
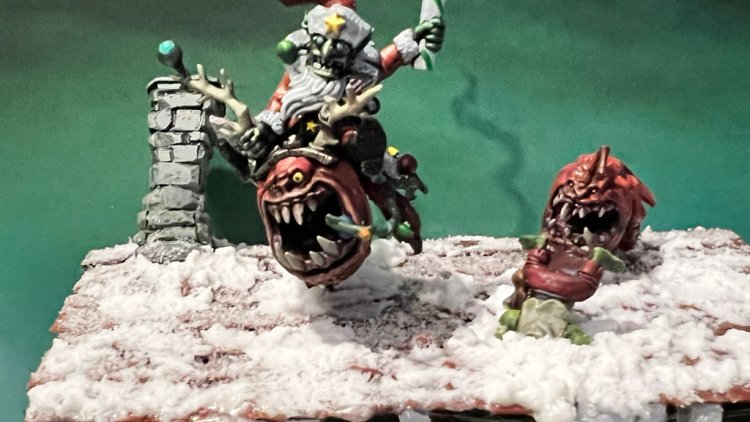
When Games Workshop announced Da Red Gobbo and Bounca for this year's festive-themed miniature, I knew I had to do another diorama. The first thing that sprung to mind was that they should be on a roof and throwing the dynamite down a chimney. This idea expanded out to include some of the walls below the roof to give more context, and then after the miniature of the month on November was revealed to be a squig I had the idea of using this on the same diorama, but that its rider has fallen off, face-planting in the snow. The first step was to figure out the sizes - I wanted it on a display plinth so checked what sizes were available, and then made a rough template out of cardboard to see how it'd look.

It seemed apparent the size of the roof overhang would need to be smaller for this scale, but it was better to discover this early. Every measurement would be taken twice and I'd use these now for cutting up wooden drink stirrers. These could be glued together using PVA glue and a longer piece to join them from behind.

After making three of these I then used more stirrers to create a frame inside that would give it some rigidity. What followed that was then research into old timber buildings to see the different methods they'd use to support the roofing shingles. One of the more common ones I looked at resembled A-frames, and I decided a variation of that would be ideal here.


With the supporting frame in place, I then used yet more stirrers to produce horizontal slats which the shingles would eventually sit on. I made no attempt to space them evenly. I then added resin shuttered windows from Rival Crafts and cut up yet more stirrers to add more detail around them.

I'd already decided at this point I wanted stonework for a ground floor below, so had to wait for some foam board to arrive which would be used for this. I was also waiting for a holepunch to arrive from Green Stuff World that would be used for creating singles. In the meantime I applied some Citadel Colours Contrast paint, "Wyldwood", to see how it'd look. Even on the resin this was applied without primer. I did then dry brush it with a lighter colour to pick out the edges and some of the grain, and used some of the slime paint from AK Interactive to age the wood a little.

Next up, I glued the resin chimney into place, again this was a piece I bought from Rival Crafts. I then used the cardboard from a Mr. Kiplings cake slice box to make many, many roofing shingles. I figured out where the overhang would be to, and then finally cut off the excess wood before gluing the first ones down. When doing these it's important to remember to start at the bottom and work up. Each row should be offset slightly from the row below. I also liked to make sure some of them didn't sit properly, and were at angles, to show this was an old roof. The trickiest bit was going around the chimney, but it worked out okay, I then used two stirrers at the apex to finish the roof off. These were all glued into place using PVA glue, and then a coat of it was covered over all tiles afterwards so it'd hold the paint better.

The colour of the roof felt like an important decision. I wanted it to fit in well with the style of the building, but also, not take away too much from the focus of Da Red Gobbo that would be standing on it. With the intention being to cover it mostly in snow flock I realised the colours would need to be strong to show through in places. Whilst weaker colours would have worked, it wasn't what I wanted.
The base colour for the tiles were Mournfang Brown, and then washed with Nuln Oil and Agrax Earthshade to create some variations in tones. The next bit is where things started to look bad for a while. I dry brushed Mephiston Red over the tiles, trying to get coverage mostly around the edges. It creates a strong contrast in colours, but this is followed with a layer of Flesh Tearers Red contrast paint which shifts the original brown layer more towards the red. I then did a light dry brush of Troll Slayer Orange, to the point where it was almost undetectable, and then applied some small amounts of Carroburg Crimson as I felt the colour was too strong initially.

I tried to use the textured rollers from Green Stuff World directly onto the foam boards, but even pressing hard it didn't leave a strong enough imprint. I decided the best way around this would be to use green stuff. It meant my measurements were now a little off, but could still be made to work. All three walls were cut as a single strip, green stuff applied, and then rollered to create a continuous pattern. Whilst it was still drying I then cut it up into the three walls, cut a doorway, and fixed the three walls together with superglue reinforced by the green stuff. I had however forgotten to cut holes for windows!

Once it was all dry I primed this using Mechanicus Standard Grey and used my usual techniques for painting stonework, but slightly toned back. The focus would be the roof, so I wanted the stonework to be dull and aged. I used various AK Interactive paints at this point to age the stones working up from the ground. At this point I could then superglue the two parts together. I'd also finished the first of the squigs, so got that into place as well.

It was around this time I realised despite the constant measurements, I'd not accounted for where the Cadian Shock Troop would stand (Cadia Stands!). This meant there'd be a need for a proper ground as there'd now be an overhang. This was a piece of strong card that was stuck to the foamboard, and glued a tree into place. The trunk of the tree was sculpted using green stuff over the twisted wires; but I didn't do a very good job of the texture, or the roots. I then coated the base with a mixture of AK Interactive mud textures. I used some spare legs to create footprints leading to the door, and used a glossier mix for this which I then used some of Green Stuff World's 'Liquid Frost' on. It didn't work quite to plan, but was reasonably satisfied with the look.

Just underneath the roof I glued into place some very small LED faerie lights, and glue taped the switch and the battery pack onto the base. These lights were then partially obscured by supergluing icicles in front of them. These were made by drawing lines of hot glue onto baking paper, and then using a toothpick to stretch it out into icicle-like structures I could then cut up. To hide where this meets the cardboard I used thick coats of PVA glue to create an ice-like effect along them. The roof was then coated with snow flock, and then on top of that I used some Citadel Valhallan Blizzard texture paint where the snow would be thickest. This was also applied to ground, leaving some space around the tree where it would be naturally sheltered from snowfall. I also replaced the ground floor windows to some that were to a more accurate scale, and added snow on top of them, and added 'frost' randomly elsewhere.

I could then glue everything else into place, and the final diorama was complete!