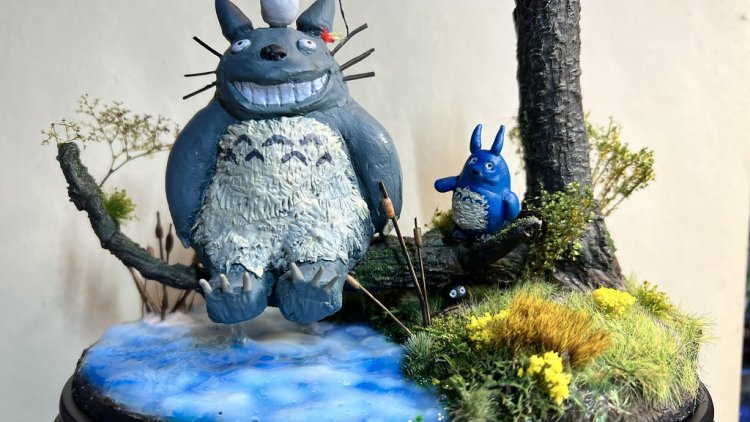
My Neighbour Totoro Diorama
When I decided I was going to sculpt a Totoro diorama I did think about what shortcuts there might be such as 3D printing, but the problem I felt with that was that the results for a novice would be unpredictable at best. It would lack that personal human touch as well, so the only option was to sculpt all of it by hand. For the scale I wanted to make this to, using Green Stuff for sculpting wasn't going to be cost effective, so instead I used some Superfine white milliput.
It's usually recommended that something such as crumpled tin foil is used as a core, however I didn't have anything suitable to hand, so instead used an entire package of milliput on sculpting the body of Totoro. With superfine white it's difficult to tell when it's mixed properly, and for something like this, superfine isn't really needed anyway. I'd recommend getting one where both parts are different colours so that you can see visually when it's fully mixed. I had to use my best judgement based on time, but then be wary of the estimated drying time of 3-4 hours. I wasn't sure how long it'd take to sculpt this.

When working with green stuff I usually use water to avoid it being sticky. With milliput I found it covered my hands in a white film that made it even harder to work with, soI did the best I could, and then let it dry for a couple of hours. When I came back, it had sagged a little, and was now looking more like Snorlax from Pokémon. Whilst I've never watched or played Pokémon, I still know what that sleepy character looks like. I had however been using several images of Totoro arranged on my screen for reference. Some were facing forwards, and some sideways on so I'd get more of a 3D picture of how the build should be.

By this time, several hours had passed and should have set, but it was still malleable, so I got back to work on it, and shaped it into something closer to how this lovable Studio Ghibli character should. After having spent a couple of hours sculpting already, this was a few more hours hurriedly done the same evening. What I was trying to achieve here though was the basic shape - as I'd found sculpting with milliput to be hard, I'd decided I'd use Green Stuff to add on the details later. It turned out to be a good job I'd spent this extra time on it as not only did it now look a lot more like Totoro, but it was now posed better so it'd eventually sit on a tree branch much better.


The following morning I thought Totoro would be dry, but it was still quite soft in places, so I decided I'd leave it drying for another 24 hours. My concern though was either I'd not mixed the two parts fully, or I'd used too much water and it'd somehow affected the consistency of it. I had to hope that more drying time would resolve the issue. In the meantime, I'd already spent quite a bit of time thinking about the base for Totoro, and I'd gone from him standing in a forest, to trying to imitate a picture I'd seen of him sitting with Chibi-Totoro, Chu-Totoro, Mei, and Satsuke. I couldn't remember if the scene was in the film or not as it'd been over a decade since I'd last seen it, but it's a visual I'd seen enough that I felt the reference would be obvious. This left me with questions I needed to answer:
- How do I do the water? I'd got Vallejo's Water Effects acrylic that was very fluid but would produce a flat surface, and AK Interactove's Water Gel acrylic that would more likely be lumpy.
- How do I make the tree branch? I felt this was something I could do use metal armatures and more milliput, just so long as it mixed right this time.
- Will the tree branch support the weight of Totoro? To a degree, I solved this pretty much as soon as I thought of it - I could drill a hole in the base and put the wires through and bend them back 90 degrees. I'd also have one or two extra wires that would go into Totoro as well.
As I felt I knew what I was doing, I went ahead and used a 170mm x 105mm oval base with parts of a cork tile broken off and stuck to it. I've had plenty of experience using cork in terrain building before so I was confident this part at least would go okay. I then used ordinary Polyfilla to sculpt the ground up to where the water would be. I watered down some cheap PVA glue and coated it with this afterwards to seal the cork and filler so it'd absorb less paint when I came to prime it. The size of the base was decided upon by it being the largest oval base I could get whilst still finding a display plinth for it that would be slightly bigger. The display plinth would serve the purpose of hiding the armatures that'd eventually poke through the base.
' '
'
For reasons I won't go in to, I'd got a bit of a deadline for making this diorama, and I'd not got all the supplies I wanted for this. The main things I'd been waiting for was the wire for armatures, and a mould for making fur. After that order arrived I'd also decided it'd be nice to have fish in the water, but I didn't feel like sculpting those, so ordered some from Green Stuff World. I figured these would arrive whilst I was away on vacation (they were posted the same day I left), and for everything else I needed to do I wrote a project plan of what I needed to get done each day as a minimum in order to hit my deadline. Admittedly this deadline was a little vague, but the plan gave me an idea of how soon it could be ready for, and this was the biggest driving factor for not sculpting the fish myself - everything else I absolutely wanted to do by hand.

More than twenty four hours had passed now, and parts such as Totoro's tail were still soft which meant there was no chance it'd ever set. Rather than destroy it and start again I decided the best thing to do was to work with what I'd got. I used Green Stuff in places where it was softest, and put a large lump of it over his head so I could behind sculpting that. In the scene I was now using for reference the mouth was closed, but I wanted that big iconic grin, so went with that instead. This was probably the hardest bit to get right, and the rest of the face was then shaped around that. Before it was dry I also cut up some sticks I'd used elsewhere for reeds, and repurposed them as whiskers. I also used small amounts of Green Stuff at this point to sculpt feet with claws, and the same for his hands. I also added a bit to support the tail as this was the one bit that was still soft and was in danger of breaking off.

The day before I flew to Jordan, my supplies arrived. I'd also decided to have some fish in the water, but felt I didn't have time to sculpt those as well, so I ordered some resin ones from Green Stuff World who are based in Spain. The order was shipped pretty quickly, and the day of my going away was the same day that they were reported as leaving Spain, so I felt confident they'd arrive before I got back. So that evening I drilled a hole through the cork and the base, and started feeding 2mm tin wire through the hole and bending it back underneath. It was far easier to bend than I was expecting so I thought carefully about branch placement so that they could support the weight of Totoro too if they needed to. These were wrapped around the first wire to not just add some bulk, but to help strengthen it. The final wire then finished around the point where I expected Totoro to be sitting. To then further strengthen this I used my hot glue gun to bind the wires together, and to also hold them in place underneath the base, and also on top of the cork.

I then used half a box of milliput in sculpting the branch and the roots before deciding that it needed the tree trunk as well. For this I used one that was already cast in resin, and then adjusted my sculpting around it. Fortunately the texture of the resin fit in okay with the branches and roots I'd already sculpted using the milliput. I also left the support for Totoro exposed. This was then left overnight, and primed the following morning using the zenithal shading technique - black first, then slightly less grey, then a very light dusting of white over the top of that. It was very last minute, as less than ten minutes after doing this I was then on my way to the airport.
Upon my return from Jordan the resin fish still hadn't arrived, and there was no update on the tracking information. I'd got a day off work still so decided I'd spend most of the day working on this so it wouldn't end up being a rush to finish - whilst I was away it was decided that I'd need to have this ready by December 18th, and that ideally needed to include drying time too. I'd anticipated five days for resin pours and then an extra day for drying, so I needed to be ready to pour by 12th December. It was now the 7th.

The first thing I did was to use Wyldwood contrast paint on the tree, and then once dry I dry brushed it with progressively lighter shades to get a wooden look. I then coated the entire base with Dark Earth acrylic from AK Interactive, and their Wet Mud one for areas that would be either underwater, or close to where the water would finish. I felt this would give it a more realistic look which is what I thought I'd try to go with. Whilst that was drying, I then began work on Totoro's fur. This started off by using Green Stuff World's fur mould, but I found it difficult to use, so ended up doing the sculpting of it myself.

I left this all to dry for around twenty four hours, and then primed Totoro with grey paint. This dried pretty quickly so I was able to use a slightly greyish white for the teeth and eyes, and then used black paint for the nose, whiskers, and the pupils of the eyes. I wasn't totally sure what shade to go with for the chest fur, but I decided on a slightly creamy white. Again, the drying time was pretty quick, so I went straight in afterwards to do the patterning on the fur using Mechanicus Standard Grey from Citadel - the same as what I'd primed it with originally.

Some of the excess milliput and Green Stuff from the other stages had gone into making a Chibi-Totoro and a couple of soot sprites. I primed the Chibi-Totoro using white paint, and then drew on some eyes. The soot sprites on the other hand were primed black, and I drew white eyes onto them with black pupils added after. Getting back to work on the base I started to weather the tree a little, and added moss and other bits of plant where I felt it would grow, but also using the original reference picture for inspiration.

For the area that would be grassy, I used some of Geek Gaming Scenics glue applied liberally over that area. I then mixed various lengths of static grass from 2mm up to 6mm with slightly varying shades, and used my static grass applicator to apply this. I made a bit of a mess to start with as I'd forgotten to turn the power on, but I was soon able to correct this and get it applied correctly. This made a big difference to the diorama straightaway, and I could now start to see how the finished result might look.

Once the glue for the grass was dry enough, I added more vegetation to the bank of the river, and added a number of fake flowers as well that I've used on other projects before. I wanted to add more life to the river, so decided I'd have a go at making some reeds. These were done by cutting up some more sticks - the same sort I'd used for the whiskers of Totoro, and then I used some rolled-up Green Stuff to make the ends. I made quite a few of these individually, and then glued them in place one by one. This was a pretty difficult process and I even tried using more acrylic to help stick them in place faster. In the end the only thing that really worked was super glue, but it wasn't that easy. At this point I was finally ready to start using Vallejo Water Texture acrylic for some nice clear water. The fish hadn't yet arrived, but I decided I could do the first pour without them, and could do the fish close to the surface.
The key to resin pours is preparation, and patience. I'd attempted this twice before: once for my Da Red Gobbo diorama that included some ice, and the second time for my Howling Banshee diorama where I'd had leakage and it'd ruined the base. This time I made sure the rim of the base was clean and smooth and then superglued some plastic from packaging around this to create a complete seal all the way around. I wasn't sure about the edges near the grass so I used hot glue there, and to be on the safe side I hot glued the underside of the plastic as well. I left this to dry for a few minutes, looked at it again, and felt I'd done everything I could to make a containment mould for the resin. I then got a container and mixed some of the water texture with a very small amount of light blue contrast paint as I wanted a slight tint to the deeper levels of the water to mimmic the sky reflecting off it. It was dilute enough that it should still have been possible to see the earth texture below. Before I started pouring, I quickly cut up a protective cover off of a paint brush and used this as extra support superglued underneath where Totoro would be sitting. It'd be more difficult to see this way, and I felt this extra support would be needed.

To my horror, the resin still managed to see through the superglue and the hot glue and I lost most of it to the surface it was standing on. I tried to pour off what I could to reuse it, but this involves a lot of risk as it'd be easy to get the resin in places it shouldn't be. My best guess was that there were air bubbles in where the superglue had dried, but wasn't sure how it'd managed to seep through the hot glue as well. So far I've not really had a successful resin pour of this type, and now I was wondering how I was going to finish this diorama. I wanted the end result to be the best I could manage, even though a lot of the skills involved in this are things I'd not attempted before. Not only have I not managed a resin pour before, but I've never sculpted anything to this scale, or using armatures before. The best option now was to use the water gel, so I tore off the containment mould and once the remaining resign was dry I applied a coat of the gel over the top of this. The resin I'd saved wasn't yet dry though so at that point I wondered if the gel would hold it in place if I poured it now. This was a terrible mistake, and prevented the gel underneath it from drying properly - this created a white border around where the resin was sitting and would now look awful.
Once dry, I needed to come up with a solution for the mess I'd made. I decided that if I used blue contrast paint over the surface of the gel I might be able to hide the mistake. I applied the contrast paint underneath where Totoro would be, so it'd be like a shadow, and then once dry I added more gel on top of this.

It took maybe five layers of the gel before I was happy, and this was difficult to apply around the reeds. In between each layer I worked on other parts of this such as adding some foilage to the branch Totoro was sitting on, and this involved a bit more Green Stuff to get one of them to stay attached properly. I also added more around the riverbank, and used another twig as a fishing rod for the Chibi-Totoro. I then sculpted the Chi-Totoro which I found to be more difficult, and I think the design of this one is much looser than the others. The colouration and quality of the paint job isn't as good either in my opinion. Not that the others are great, but I tried.
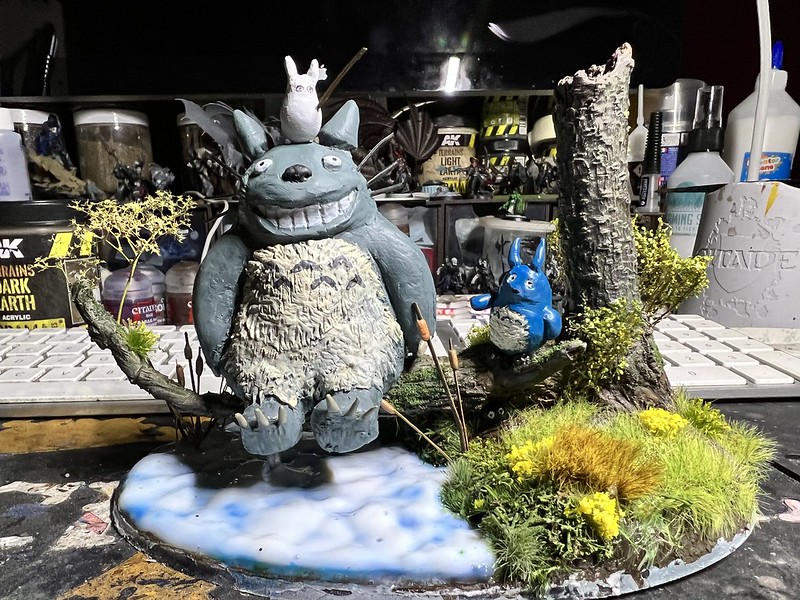
The fish from Green Stuff World didn't arrive until 20th December, so were sadly never used in this diorama, meaning that everything was sculpted by hand. To finish this diorama off, I wanted to glue this to a plinth, though it didn't quite sit right due to the wires and hot glue underneath the base. The solution to this was to chisel out with a hobby knife enough wood for it to sit properly. I also wanted to be confident it'd stay attached so also used some more Green Stuff to bond them together along with some superglue along the rim.